'%20id='layer1'%3e%3cpath%20id='path4214-1'%20d='m%20513.28678,817.4353%2044.48923,-0.0267%20c%200,0%2015.92115,44.08054%2023.16963,64.01267%20-24.16923,0.002%20-67.59731,0.18026%20-67.59731,0.18026%20z%20m%2036.12731,20.03395%20-18.74421,0.006%20-0.001,4.98142%2020.5565,0.026%20-1.81096,-5.01324%20z'%20style='fill:%230070ba;fill-opacity:1'%20/%3e%3cpath%20id='path4227-1'%20d='m%20562.7939,817.4532%2050.44354,-0.002%207.34289,20.06648%20-21.99767,-0.003%201.76407,4.91071%20c%2012.24698,0.0525%2022.19181,0.0893%2022.19181,0.0893%20l%205.72186,15.82812%20-22.06758,0.007%201.82299,4.99272%2022.06946,0.009%206.64204,18.16331%20-17.03093,0%20-33.66191,0%20c%20-7.7658,-21.41361%20-23.24057,-64.06149%20-23.24057,-64.06149%20z'%20style='fill:%230070ba;fill-opacity:1'%20/%3e%3cpath%20id='path4240-4'%20d='m%20618.16758,817.48402%2023.72287,-0.0597%204.98721,20.10113%20-0.0558,-20.02634%2025.03552,-0.0724%201.7e-4,64.02208%20-30.37353,0.0145%20z'%20style='fill:%230070ba;fill-opacity:1'%20/%3e%3cpath%20id='path4253-1'%20d='m%20676.85381,817.43778%2025,0%200.0391,45.92188%2037.33564,-0.01%206.59852,18.09515%20-68.97322,-0.007%20z'%20style='fill:%23ffffff'%20/%3e%3cpath%20id='path4266-9'%20d='m%20742.44332,858.34911%20-16.41953,0.004%20-18.26329,0%200,-23%200.008,-17.93468%2043.30764,0.002%2023.27914,64.02767%20-23.49563,0.009%20z%20m%20-5.76584,-15.83191%20-1.71096,-5.02842%20-11.95353,0.0482%200.0357,5.06649%20z'%20style='fill:%23ffffff'%20/%3e%3cpath%20id='path4279-7'%20d='m%20756.12574,817.43729%2048.40893,0.005%2023.29206,64.00907%20-48.40475,-0.004%20z%20m%2042.39829,40.90473%20-9.45736,0.007%201.82095,5.01361%209.41134,-0.0127%20z%20m%20-17.06257,-20.91747%201.77515,5.09214%209.66041,0.0362%20-1.77137,-5.13805%20z'%20style='fill:%23ffffff'%20/%3e%3cpath%20id='path4292-4'%20d='m%20826.45561,863.50302%2040.58765,0.0465%20-1.75495,-5.03536%20-40.67075,-0.0893%20-14.65675,-40.8211%2070.99812,-0.0205%200.0313,19.95822%20-47.63065,0.0279%201.95023,4.99651%2045.62982,0.0598%200.0593,38.82578%20-48.09324,-0.003%20z'%20style='fill:%23ffffff'%20/%3e%3c/g%3e%3c/svg%3e)
Python Tkinter Basics: An Introduction to Tkinter UI with the Grid Layout
Tkinter is a popular library for creating user interfaces with Python. In this tutorial you will learn the usage of the Grid-Layout
The Grid Layout organizes widgets in a grid structure, with each widget placed in a cell defined by its row and column. It's a powerful layout that allows you to define the exact position and size of each widget.
In order to use the grid layout, we have to place the ui components using the grid method. The grid method can be used with the following parameters:
- row: The row index of the grid cell where the widget will be placed.
- column: The column index of the grid cell where the widget will be placed.
- rowspan: The number of rows that the widget will span (default value is 1).
- columnspan: The number of columns that the widget will span (default value is 1).
- ipadx: The amount of internal padding to add to the widget in the X direction.
- ipady: The amount of internal padding to add to the widget in the Y direction.
- padx: The amount of external padding to add to the widget in the X direction.
- pady: The amount of external padding to add to the widget in the Y direction.
There is also the sticky parameter which can be used to specify how to fill the cell if the cell is larger than the widget. This can be a combination of the following values:
- 'n', 's', 'e', 'w': The widget should stick to the top, bottom, right, or left side of the cell, respectively.
- 'nw', 'ne', 'sw', 'se': The widget should stick to the top-left, top-right, bottom-left, or bottom-right corner of the cell, respectively.
- 'ns', 'ew': The widget should expand to fill the entire height or width of the cell, respectively.
- 'nsew': The widget should expand to fill both the height and width of the cell.
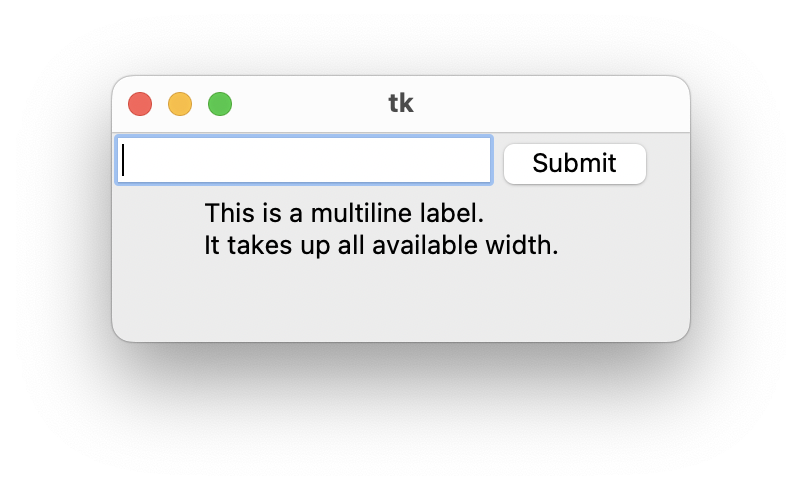
Here's an example of the grid layout with a text input and a submit button in the first row and a multiline label in the second row:
import tkinter as tk

root = tk.Tk()

# Create the text input and submit button in the first row
text_input = tk.Entry(root)
submit_button = tk.Button(root, text="Submit")
text_input.grid(row=0, column=0)
submit_button.grid(row=0, column=1)

# Create the multiline label in the second row
label_text = tk.StringVar()
label_text.set("This is a multiline label.\nIt takes up all available width.")
multiline_label = tk.Label(root, textvariable=label_text, justify="left", anchor="w", wraplength=root.winfo_screenwidth())
multiline_label.grid(row=1, column=0, columnspan=2)

root.mainloop()