'%20id='layer1'%3e%3cpath%20id='path4214-1'%20d='m%20513.28678,817.4353%2044.48923,-0.0267%20c%200,0%2015.92115,44.08054%2023.16963,64.01267%20-24.16923,0.002%20-67.59731,0.18026%20-67.59731,0.18026%20z%20m%2036.12731,20.03395%20-18.74421,0.006%20-0.001,4.98142%2020.5565,0.026%20-1.81096,-5.01324%20z'%20style='fill:%230070ba;fill-opacity:1'%20/%3e%3cpath%20id='path4227-1'%20d='m%20562.7939,817.4532%2050.44354,-0.002%207.34289,20.06648%20-21.99767,-0.003%201.76407,4.91071%20c%2012.24698,0.0525%2022.19181,0.0893%2022.19181,0.0893%20l%205.72186,15.82812%20-22.06758,0.007%201.82299,4.99272%2022.06946,0.009%206.64204,18.16331%20-17.03093,0%20-33.66191,0%20c%20-7.7658,-21.41361%20-23.24057,-64.06149%20-23.24057,-64.06149%20z'%20style='fill:%230070ba;fill-opacity:1'%20/%3e%3cpath%20id='path4240-4'%20d='m%20618.16758,817.48402%2023.72287,-0.0597%204.98721,20.10113%20-0.0558,-20.02634%2025.03552,-0.0724%201.7e-4,64.02208%20-30.37353,0.0145%20z'%20style='fill:%230070ba;fill-opacity:1'%20/%3e%3cpath%20id='path4253-1'%20d='m%20676.85381,817.43778%2025,0%200.0391,45.92188%2037.33564,-0.01%206.59852,18.09515%20-68.97322,-0.007%20z'%20style='fill:%23ffffff'%20/%3e%3cpath%20id='path4266-9'%20d='m%20742.44332,858.34911%20-16.41953,0.004%20-18.26329,0%200,-23%200.008,-17.93468%2043.30764,0.002%2023.27914,64.02767%20-23.49563,0.009%20z%20m%20-5.76584,-15.83191%20-1.71096,-5.02842%20-11.95353,0.0482%200.0357,5.06649%20z'%20style='fill:%23ffffff'%20/%3e%3cpath%20id='path4279-7'%20d='m%20756.12574,817.43729%2048.40893,0.005%2023.29206,64.00907%20-48.40475,-0.004%20z%20m%2042.39829,40.90473%20-9.45736,0.007%201.82095,5.01361%209.41134,-0.0127%20z%20m%20-17.06257,-20.91747%201.77515,5.09214%209.66041,0.0362%20-1.77137,-5.13805%20z'%20style='fill:%23ffffff'%20/%3e%3cpath%20id='path4292-4'%20d='m%20826.45561,863.50302%2040.58765,0.0465%20-1.75495,-5.03536%20-40.67075,-0.0893%20-14.65675,-40.8211%2070.99812,-0.0205%200.0313,19.95822%20-47.63065,0.0279%201.95023,4.99651%2045.62982,0.0598%200.0593,38.82578%20-48.09324,-0.003%20z'%20style='fill:%23ffffff'%20/%3e%3c/g%3e%3c/svg%3e)
Python Tkinter Basics: An Introduction to Tkinter UI with the Place Layout
Tkinter is a popular library for creating user interfaces with Python. In this tutorial you will learn the usage of the Place-Layout
The Place layout allows you to specify the exact position and size of each widget using absolute coordinates. It's useful for creating complex layouts, but it requires a lot of manual positioning.
To use the place layout we have to call the place method. This method accepts following parameters:
- x: The X coordinate of the upper-left corner of the widget, relative to the parent widget's upper-left corner.
- y: The Y coordinate of the upper-left corner of the widget, relative to the parent widget's upper-left corner.
- width: The width of the widget.
- height: The height of the widget.
- relx: The relative X coordinate of the upper-left corner of the widget, as a percentage of the parent widget's width.
- rely: The relative Y coordinate of the upper-left corner of the widget, as a percentage of the parent widget's height.
- relwidth: The relative width of the widget, as a percentage of the parent widget's width.
- relheight: The relative height of the widget, as a percentage of the parent widget's height.
- anchor: Specifies where the widget should be anchored within its parent widget. This can be a combination of the following values: 'n', 's', 'e', 'w': The widget should be anchored to the top, bottom, right, or left side of its parent, respectively. 'nw', 'ne', 'sw', 'se': The widget should be anchored to the top-left, top-right, bottom-left, or bottom-right corner of its parent, respectively.
- bordermode: Specifies how the widget's size should be calculated. This can be one of the following values: 'inside': The widget's size is calculated based on its internal dimensions, without including any border or padding. 'outside': The widget's size is calculated based on its external dimensions, including any border or padding.
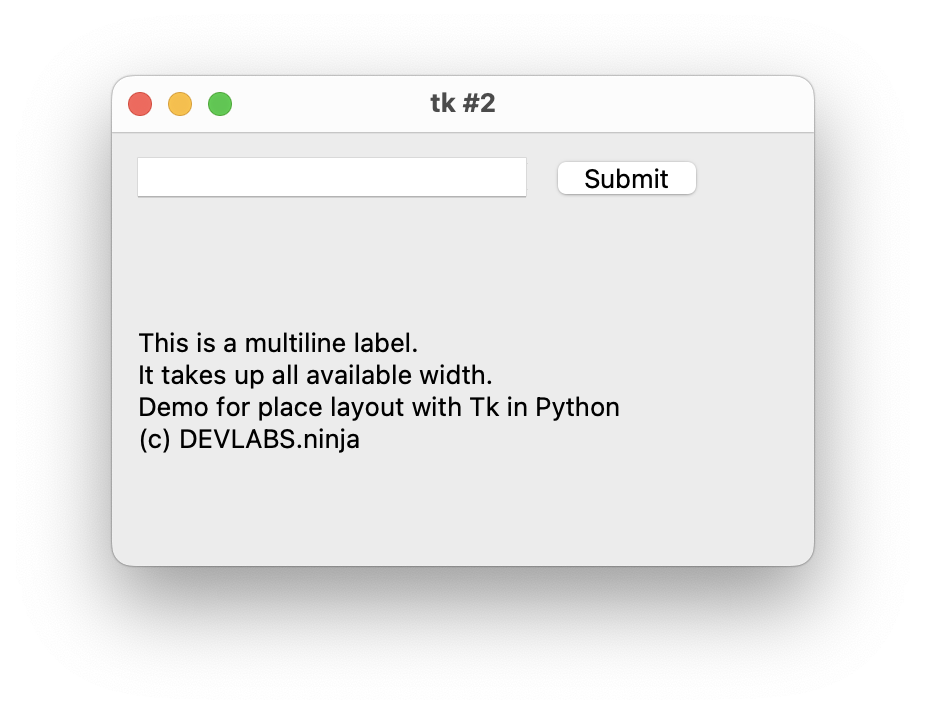
The example below shows the usage of the place-layout with the same layout which we already implemented in the previous tutorial for the grid-layout:
import tkinter as tk

root = tk.Tk()

# Create the text input and submit button using the Place layout
text_input = tk.Entry(root)
submit_button = tk.Button(root, text="Submit")
text_input.place(x=10, y=10, width=200, height=25)
submit_button.place(x=220, y=10, width=75, height=25)

# Create the multiline label using the Place layout
label_text = tk.StringVar()
label_text.set("This is a multiline label.\nIt takes up all available width.\nDemo for place layout with Tk in Python\n(c) DEVLABS.ninja")
multiline_label = tk.Label(root, textvariable=label_text, justify="left", anchor="w", wraplength=root.winfo_screenwidth())
multiline_label.place(x=10, y=50, relwidth=1.0, relheight=1.0, width=-20, height=-60)

root.mainloop()